


Opinion
How to Build and Test an IoT Device in AWS: Part 2 - Simple Test Harness
Published on 20 Jun, 2023 by Stephen
In the previous blog, we set up a Raspberry Pi with a Sense Hat, then wrote an application which records sensor readings on request and sends them to AWS IoT Core to be stored in an S3 bucket.
Next, we need to test our IoT application to make sure it behaves as we expect it. The main function of the application so far is to store records in S3, so this is where we need to focus our testing to start with. We are going to build a separate application to act as a test harness for the whole end-to-end process: from the real-life device application to the cloud services and artefacts.
What’s wrong with unit tests?
Nothing! Unit tests are a valuable way to isolate and test the core functionality of an application and to catch regressions in ongoing development. But unit tests can only get you so far when testing an IoT application that has hardware-specific components (e.g. a Pi Sense Hat) and uses multiple cloud-based components and managed services - a key selling point of managed services is that we don’t need to test them!
If this was a production application, we should be writing unit tests for it. But there are plenty of blogs out there that already cover that, so here I will be focusing on end-to-end integration tests.
How will our harness work?
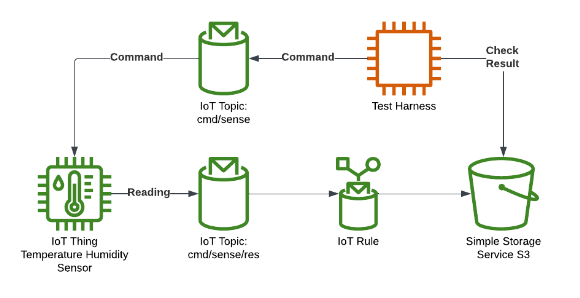
The test harness needs to sit between the MQTT topic used to communicate to the device, and the S3 bucket the results are stored in. It should simulate the sending of a ‘record’ command and then check the result in S3 - closing the loop on the device- and cloud-side components of our application.
The harness is effectively mimicking a user-driven request that would be made in a web-app UI and might be running as a backend web service or perhaps in a client-side browser. So python could be a good choice again, but javascript is also a good choice. We will use Typescript here for the sake of variety and to get a more rigorous codebase than plain javascript. The harness will be run locally using node but could be easily ported to a web application or a lambda function.
The architecture is shown below. The flow will work as follows:
- The harness sends a ‘record’ command to the command MQTT topic.
- The device is listening on the command topic, receives the command, and takes a reading.
- The device sends the result to the response MQTT topic.
- The Rule receives the result and stores it in S3.
- The harness checks S3 to verify that the result has arrived as expected.

Building the test harness
Step 1: Create a Typescript framework application
First we need to set up a node application and create some utility functions we can use to write actual tests. We need to be able to send MQTT messages to a specific topic in IoT Core, and fetch a specific set of objects from S3.
Set up project
Install nodejs for your OS (see https://nodejs.org/en), I used node version 18. Create your project directory (e.g. $ mkdir piot-test-harness) and navigate there, then use the node package manager (NPM) to install typescript:
$ npm install typescript --save-dev
And then initialise the project:
$ npx tsc --init
This will set up the project, create the package.json files for the project details, as well as a tsconfig for the typescript transpilation parameters. The tsconfig file will define what typescript rules to use, how strictly to apply them etc. Generally, the defaults are pretty good but feel free to modify as you like.
Some quality of life packages: We will use ts-node to run the application ($ npm install ts-dev –save-dev), and eslint to lint our code ($ npm install eslint –save-dev).
Create a src folder and an index.ts file in there containing a simple (console.log('Hello world');). Then finally add a few useful scripts to the package.json file:
"scripts": {
   "start": "ts-node --files ./src/index.ts",
   "lint": "eslint '*/**/*.{js,ts}'",
   "tsc": "tsc"
 }
See below for the full package.json file, once everything has been added.
Now you should have a skeleton project that will run with the command:
$ npm run start
Publish an MQTT message
We want a utility function that will send a single JSON message to the specified topic in our account. To do this, we will use the AWS SDK v3 (https://docs.aws.amazon.com/AWSJavaScriptSDK/v3/latest/index.html) and personal access keys to connect to IoT Core in our AWS account. See https://docs.aws.amazon.com/IAM/latest/UserGuide/id_credentials_access-keys.html for info on access keys, ideally use a profile with restricted access and/or temporary access keys, as per security best practices. To install the correct AWS SDK package run:$ npm install @aws-sdk/client-iot-data-plane
Then create a mqtt.ts file in the src directory and add the following:
import * as IoT from "@aws-sdk/client-iot-data-plane";


/**
* Publish an MQTT message to the specified topic using QoS 1. Assumes region is eu-west-1.
*
* @param iotEndpoint IoT endpoint for the command to use.
* @param topic The topic to send the message to.
* @param payload The message payload object.
*/
export async function publishMessage<T>(iotEndpoint: string, topic: string, payload: T): Promise<void> {
   const client = new IoT.IoTDataPlaneClient({ region: 'eu-west-1', endpoint: iotEndpoint });
   const input = {
       topic: topic,
       qos: 1,
       payload: new TextEncoder().encode(JSON.stringify(payload)),
   };
   const command = new IoT.PublishCommand(input);
   await client.send(command);
}
There’s a lot going on here for so few lines, but here is a summary:
- We’re creating a public asynchronous function to publish a message, this will return a JS Promise.
- It uses a Typescript generic input <T> to signify it will accept a specific typed object.
- It uses the AWS SDK v3 pattern of creating a specific service client and a specific operation command, then uses the client to execute the command.
- We’re hardcoding the AWS region to ‘eu-west-1’ and providing your own IoT Core endpoint as an input (see the previous blog for details on how to get this).
- We’re sending the MQTT message with a QoS of 1 (again, see previous blog) and it must take a JSON object as an input.
Fetch objects from S3
The other utility function we want is to fetch relevant sensor objects from S3. At this point we need to consider a little more about what ‘relevant’ objects means. In this case, we will want to trigger the creation of an object and then check for that specific object (otherwise what are we even testing!). Let’s make a start on our functions and consider how we might achieve this…
Firstly, we will simply get an object in the bucket, based on its object key:
import * as S3 from '@aws-sdk/client-s3'


/**
* Fetch an object with the specified key.
*
* @param bucket Name of the S3 bucket.
* @param objectKey The full object key.
*/
async function getOne<T>(bucket: string, objectKey: string): Promise<T>{
   const client = new S3.S3Client({region: 'eu-west-1'});


   const command = new S3.GetObjectCommand({
       Bucket: bucket,
       Key: objectKey
   });


   const response = await client.send(command);
   const bodyString = await response.Body?.transformToString() ?? '{}';


   return JSON.parse(bodyString)
}
As with the IoT SDK, we’ll create a client, build a command, send the command, and then await a result. Unlike the MQTT function, we are expecting a response that we need to then parse into our generic type.
So we can now get an object and it's safe to say we know the name of the bucket, but how do we know what object key to fetch? This is the point we need to think about our actual data. We want to check we have an object that arrived after a specific point in time.
Luckily for us, we’re already identifying our objects by the time they arrive: the Rule generates the object key according to the timestamp in the format yyyyMMdd-HHmmss. The S3 API provides us with a way to list keys alphabetically from a specific start point. Putting this together we get the following:
/**
* Get a list of keys for all objects in a bucket that were added after a specific time, this requires object keys to be in the format data/sense/YYYYMMDD-HHmmss.
* Times are generated by S3 as UTC.
*
* @param client S3 client object.
* @param startTime The earliest time to start fetching objects from.
*/
async function listKeys(bucket: string, startTime: Date): Promise<string[]>{
   const client = new S3.S3Client({region: 'eu-west-1'});
   const startTimeString = `${startTime.getUTCFullYear().toString()}${(startTime.getUTCMonth()+1).toString().padStart(2, '0')}${startTime.getUTCDate().toString().padStart(2, '0')}-${startTime.getUTCHours().toString().padStart(2, '0')}${startTime.getUTCMinutes().toString().padStart(2, '0')}${startTime.getUTCSeconds().toString().padStart(2, '0')}`
   // format: yyyyMMdd-HHmmss


   const command = new S3.ListObjectsV2Command({
   Bucket: bucket,
   StartAfter: `data/sense/${startTimeString}`
   });


   let isTruncated = true;
   const objectKeys: string[] = [];


   while (isTruncated) {
       const { Contents, IsTruncated, NextContinuationToken } = await client.send(command);
       const contentsList = Contents ? Contents.map((c) => c.Key ?? ''): [];
       objectKeys.push(...contentsList);
       isTruncated = IsTruncated ?? false;
       command.input.ContinuationToken = NextContinuationToken;
   }


   return objectKeys
}
The main points here are:
- As usual, we’ll create the client, build a command, and execute the command.
- Constructing the date string looks a bit complicated, each component needs to extracted from the date, it needs to be in UTC to match the AWS services, some need to be padded to be the correct length, and the classic javascript ‘feature’ of getMonth counting from 0 but all the others from 1!
- The results need to be extracted from the response, which is a little more complex. We are extracting the key of each ‘Contents’ object and collecting them into an objectKeys list.
- While it is unlikely to be relevant to our use-case (we are not expecting many objects to match!), it will loop through S3’s pagination using the ‘IsTruncated’ check and the continuation token provided by S3.
Then we simply combine the two functions: list all the keys after a specified time, then fetch all the objects for those keys. See below for the full content of the s3.ts file:
import * as S3 from '@aws-sdk/client-s3'


/**
* Get a list of objects for all objects in a bucket that were added/modified after a specific time. Assumes region is eu-west-1
*
* @param bucket Name of the S3 bucket.
* @param startTime The earliest time to start fetching objects from.
*/
export async function getObjects<T>(bucket: string, startTime: Date): Promise<T[]>{
   const client = new S3.S3Client({region: 'eu-west-1'});

   const objectKeys = await listKeys(client, bucket, startTime)
   const objects = await Promise.all(objectKeys.map(async key => await getOne<T>(client, bucket, key)))
   return objects
}


/**
* Get a list of keys for all objects in a bucket that were added after a specific time, this requires object keys to be in the format data/sense/YYYYMMDD-HHmmss.
* Times are generated by S3 as UTC.
*
* @param client S3 client object.
* @param bucket Name of the S3 bucket.
* @param startTime The earliest time to start fetching objects from.
*/
async function listKeys(client: S3.S3Client, bucket: string, startTime: Date): Promise<string[]>{
   const startTimeString = `${startTime.getUTCFullYear().toString()}${(startTime.getUTCMonth()+1).toString().padStart(2, '0')}${startTime.getUTCDate().toString().padStart(2, '0')}-${startTime.getUTCHours().toString().padStart(2, '0')}${startTime.getUTCMinutes().toString().padStart(2, '0')}${startTime.getUTCSeconds().toString().padStart(2, '0')}`
   // format: yyyyMMdd-HHmmss

   const command = new S3.ListObjectsV2Command({
   Bucket: bucket,
   StartAfter: `data/sense/${startTimeString}`
   });


   let isTruncated = true;
   const objectKeys: string[] = [];


   while (isTruncated) {
       const { Contents, IsTruncated, NextContinuationToken } = await client.send(command);
       const contentsList = Contents ? Contents.map((c) => c.Key ?? ''): [];
       objectKeys.push(...contentsList);
       isTruncated = IsTruncated ?? false;
       command.input.ContinuationToken = NextContinuationToken;
   }


   return objectKeys
}


/**
* Fetch an object with the specified key.
*
* @param client S3 client object.
* @param bucket Name of the S3 bucket.
* @param objectKey The full object key.
*/
async function getOne<T>(client: S3.S3Client, bucket: string, objectKey: string): Promise<T>{
   const command = new S3.GetObjectCommand({
       Bucket: bucket,
       Key: objectKey
   });


   const response = await client.send(command);
   const bodyString = await response.Body?.transformToString() ?? '{}';


   return JSON.parse(bodyString)
}
Here you’ll see a public ‘getObjects’ function that calls the two previous functions in sequence. You might also notice that the other two have been tweaked to take the S3 client as an input, so we can share the open S3 client for efficiency.
Step 2: Write some tests
Now we have the tools for the job, it is time to actually write tests!
Tests as a script
For our first test, we’ll just write a simple script that runs the test and logs a message. The simplest test case is to send a valid ‘record’ request, give it a few seconds to process, then check that a new reading has arrived. We can do that by capturing the start time of the test run and using that as our starting point for the S3 object search, as below:
import { publishMessage } from './mqtt'
import { getObjects } from './s3'


const ENDPOINT = 'https://abc123456-ats.iot.eu-west-1.amazonaws.com'


async function testRecord(): Promise<boolean> {
   const startTime = new Date();  // now

   await publishMessage<MqttCommand>(ENDPOINT, 'cmd/raspberry-piot/sense', {command: 'record'})


   // Wait a few seconds for the reading to reach S3
   await new Promise(resolve => {
       setTimeout(resolve, 3000);
   });


   const objects = await getObjects<SenseReading>('raspberry-piot-data-eu-west-1', startTime)

   console.log(objects);
   return objects.length == 1
}


console.log('Hello world');


const main = async () => {
   const testResult = await testRecord()
   console.log(`Test successful: ${testResult}`);
};


main()
Make sure you’ve updated ENDPOINT to your own IoT Core endpoint (see previous blog for this) and of course, make sure your device is and sense application is actually running! Then start the script with:$ npm run start
If all goes well, you should see a logged message of “Test successful: true”, just as a sanity check you should also see the logs on your Pi match and the reading object should be present in S3.
Congratulations! You’ve successfully tested your IoT application!
Using a test framework
While we can now say we’ve got a test harness ready to go, it is a bit primitive in the way it runs and outputs test results. Now we could start coding our own framework, output, test orchestration etc… But thankfully, this is all well-trodden ground. There are several ready-to-go testing frameworks for javascript/typescript that we can use, where someone else has done the hard work for us.
One of the most commonly used of these frameworks is Jest https://jestjs.io/. Jest is a widely used and well-supported framework that also comes with typescript support. Jest can be installed as follows:$ npm install --save-dev jest
But this just installs the JS components. We also want all our typescript goodness to extend to our jest tests, and ts-jest gives us just that:$ npm install --save-dev ts-jest
And to get the types:$ npm install --save-dev @types/jest
A few final tweaks to our package.json file and we are ready to go. Adding the line "test": "jest" to the ‘scripts’ section will let us run all our jest tests. We also need to add some configuration for jest itself, see the ‘jest’ section in the (now-complete) package. json file below:
{
 "name": "piot-tester",
 "version": "1.0.0",
 "description": "This is an automated test harness for the RPi IoT App.",
 "scripts": {
   "start": "ts-node --files ./src/index.ts",
   "lint": "eslint '*/**/*.{js,ts}'",
   "test": "jest",
   "tsc": "tsc"
 },
 "author": "Me",
 "license": "ISC",
 "devDependencies": {
   "@types/jest": "^29.5.1",
   "@typescript-eslint/eslint-plugin": "^5.57.1",
   "@typescript-eslint/parser": "^5.57.1",
   "eslint": "^8.37.0",
   "jest": "^29.5.0",
   "ts-jest": "^29.1.0",
   "ts-node": "^10.9.1",
   "typescript": "^5.0.3"
 },
 "dependencies": {
   "@aws-sdk/client-iot-data-plane": "^3.316.0",
   "@aws-sdk/client-s3": "^3.305.0"
 },
 "jest": {
   "rootDir": ".",
   "testRegex": ".test.ts$",
   "testEnvironment": "node",
   "verbose": true,
   "transform": {
     "^.+\\.(t|j)s$": "ts-jest"
   },
   "moduleNameMapper": {
     "src/(.*)": "<rootDir>/src/$1",
     "tests/(.*)": "<rootDir>/tests/$1"
   }
 }
}
This tells jest to look in a ‘tests’ directory next to our ‘src directory for tests with the extension .test.ts, there’s also some transforms to help ts-jest figure out the transpilation, and a mapper to make sure our test files can find our imports.
So now create a new directory ‘tests’ at the same level as ‘src’, and create a test file called ‘sense.test.ts’. Let’s rewrite our same test from before using jest’s syntax:
import { publishMessage } from '../src/mqtt'
import { getObjects } from '../src/s3'


const ENDPOINT = 'https://abc123456-ats.iot.eu-west-1.amazonaws.com'


test('Test the sense device records a reading successfully', async () => {
   const startTime = new Date();  // now

   await publishMessage<MqttCommand>(ENDPOINT, 'cmd/raspberry-piot/sense', {command: 'record'})


   // Wait a few seconds for the reading to reach S3
   await new Promise(resolve => {
       setTimeout(resolve, 3000);
   });


   const objects = await getObjects<SenseReading>('raspberry-piot-data-eu-west-1', startTime)

   expect(objects.length).toBe(1);
 });
Not only is this simpler and neater than our script from before, it uses some more standard testing syntax like defining a ‘test’ and ‘expect’ -ing some results.
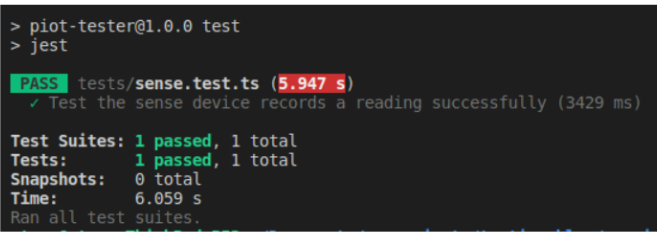
As before, make sure the ‘ENDPOINT’ parameter is updated and the sense application on the device is running then start jest with:$ npm test
All that hard work should be rewarded with a handy results view:

What’s next?
We’ve reached the end of this article but we have just dipped our toes into what we can do with this kind of test application. Even with the relatively simple outcomes of our IoT application, we haven’t covered all the possible functionality, for example, we could write a negative test that checks no reading appears when an invalid command is sent to the device. Following this line of thought, you can see that there’s a number of limitations in the application itself, for example:
- There’s no response for the requester in the case of an invalid command, so this could be improved.
- We identified our records purely on timestamps - what if multiple devices sent readings? Each device would be publishing/subscribing on the same topics, so some kind of device ID could be added.
There are also a few areas the harness could be improved further. A key difference with these e2e tests vs unit tests, is that it is very difficult to keep them side-effect free i.e. we are creating an actual permanent record in our S3 bucket. However, we could at least clean up records we create during tests in setup/teardown steps to keep the test environment clean.
In the test detailed above we are also fairly limited in the validation of the data. This is more of a ‘real-life’ constraint than a software one - if we could predict what the temperature etc. is from the cloud then an IoT device would be pretty unnecessary here! - and if we added more configuration data to the reading (e.g. a device ID) we could validate that. But it is a common IoT problem, it would be much easier to test the whole application and setup if we had some kind of hardware emulation…