


Opinion
How to Build and Test an IoT Device in AWS: Part 1 - Build a Sensor Device
Published on 30 Jun, 2022 by Stephen
Why is testing important?
I accept I am probably preaching to the choir here… but good testing is a vital part of any successful application! In particular, IoT devices are often expected to run for long periods of time without maintenance or active monitoring. In many cases, devices will be sent out into the world with limited opportunity to diagnose a problem and deploy a fix without sending a human out into the world to bring the device back. While options for Over The Air (OTA) updates are increasingly available, they are not yet widespread and require additional frameworks on the device, making them unsuitable for some applications.
The user experience with IoT devices is often limited, with not much in the way of UI to indicate that something is wrong or how to fix it. The IoT user experience must also compete with the plain old ‘Thing’ experience: if a consumer buys a brand new, expensive ‘Smart’ device or appliance they will expect it to just work, as the ‘Dumb’ version does. They will not care how fancy and much more complicated their ‘Smart’ kettle is if it cannot provide them with boiling water!
Why is it hard?
The cloud is a natural partner for deploying, managing, and monitoring IoT solutions. However, the beautiful union of these two technologies often brings together the ‘run-anything-anywhere’ cloud approach and the ‘right-tool-for-the-job’ world of embedded systems. In order to get the perfect performance for the lowest cost, IoT devices often need to run on very restricted hardware and firmware. The need to test your IoT application on the right hardware, in the right OS, and using the right peripherals is often at odds with modern approaches such as continuous testing and cloud-based CI/CD pipelines. In fact, running and testing the software may not be representative (or even possible) on a developer’s local machine! To add to this, an action on the device may lead to a result in the cloud, which all needs to be tested.
In more complex IoT solutions, the mixture of hardware and software makes modularity highly desirable, just as in a cloud-based microservices architecture. Component-level testing becomes much easier in this situation. However, the end-to-end paths still need to be tested thoroughly, including any unhappy paths where components fail. If some of those components are very reliable or out of your direct control then it becomes much harder to cover all paths: imagine a smart control unit connecting to a dumb appliance, or a home hub device connecting to a boiler, air conditioning, lighting, etc. Hitting a once-in-a-million fault in a particular component in your dev/QA setup is very rare or very time consuming, hitting it when you have ten thousand devices in active use is pretty much inevitable!
What can I do about it?
Despite all these IoT-specific challenges, many of the standard software testing approaches are applicable and effective: unit testing, integration testing, and CI/CD pipelines are all effective to validate the solution in principle and minimise regression in any new updates. There are also some more colourful solutions that can be used to compensate for the lack of ‘cloud hardware’, for example, in-code mocking based on environment (use with extreme caution!) or using socat (https://linux.die.net/man/1/socat) or com0com (http://com0com.sourceforge.net/) to emulate serial ports.
However, there is no substitute for running the real software on a real device, getting as close to a production setup as possible. Inevitably, this leads us to purpose-built test harnesses and hardware emulation. So here is where this article comes in! I will be presenting a series of how-to guides to show one way of doing the following:
- Building a basic IoT sensor that captures environmental data and stores it in AWS S3.
- Creating a test harness application that runs tests on the IoT device and checks the results in the cloud.
- Modify the IoT device to act as a controller for a separate component, build a simple emulator for the new component, and update the test harness to cover this new functionality.
- Add simulated ‘failure modes’ to the emulator that can be triggered by the test harness and run tests on the full range of outcomes.
For this tutorial, I will be using a raspberry pi 3 with a sense hat (https://www.raspberrypi.org/products/sense-hat/) as a great example of a readily available and flexible IoT-ready device. In reality, a large scale IoT application would probably be better served by more specific and specialised hardware. I will be coding in python 3 throughout, both for compatibility with the sense hat and because it’s just easier to read! I will be using the AWS IoT Core and S3 services on the cloud side. However, much of the code could easily be written in any language and the AWS SDKs used here are available in most popular languages, including C/C++, Java, and Javascript. With all that out the way, let’s get started!
Building a cloud-connected IoT sensor
Please bear in mind the AWS console frequently gets updates (usually for the better), so some screenshots in this section may be out of date, but the process remains the same.
Step 1: Create the cloud resources
First things first, we need to create a Thing in AWS and set it up with all the correct permissions and certificates. I will be using the AWS console here but you could use the CLI if you prefer.
Create Thing
Navigate to the IoT Core console from the services dropdown, this service console is where will do the majority of our cloud work. On the left hand menu, select the Manage dropdown, then Things. This page will show all your previously created Things, if you have any. Hit the Create things button and select Create single thing. You can give your new Thing a useful name and various other properties on the next page:

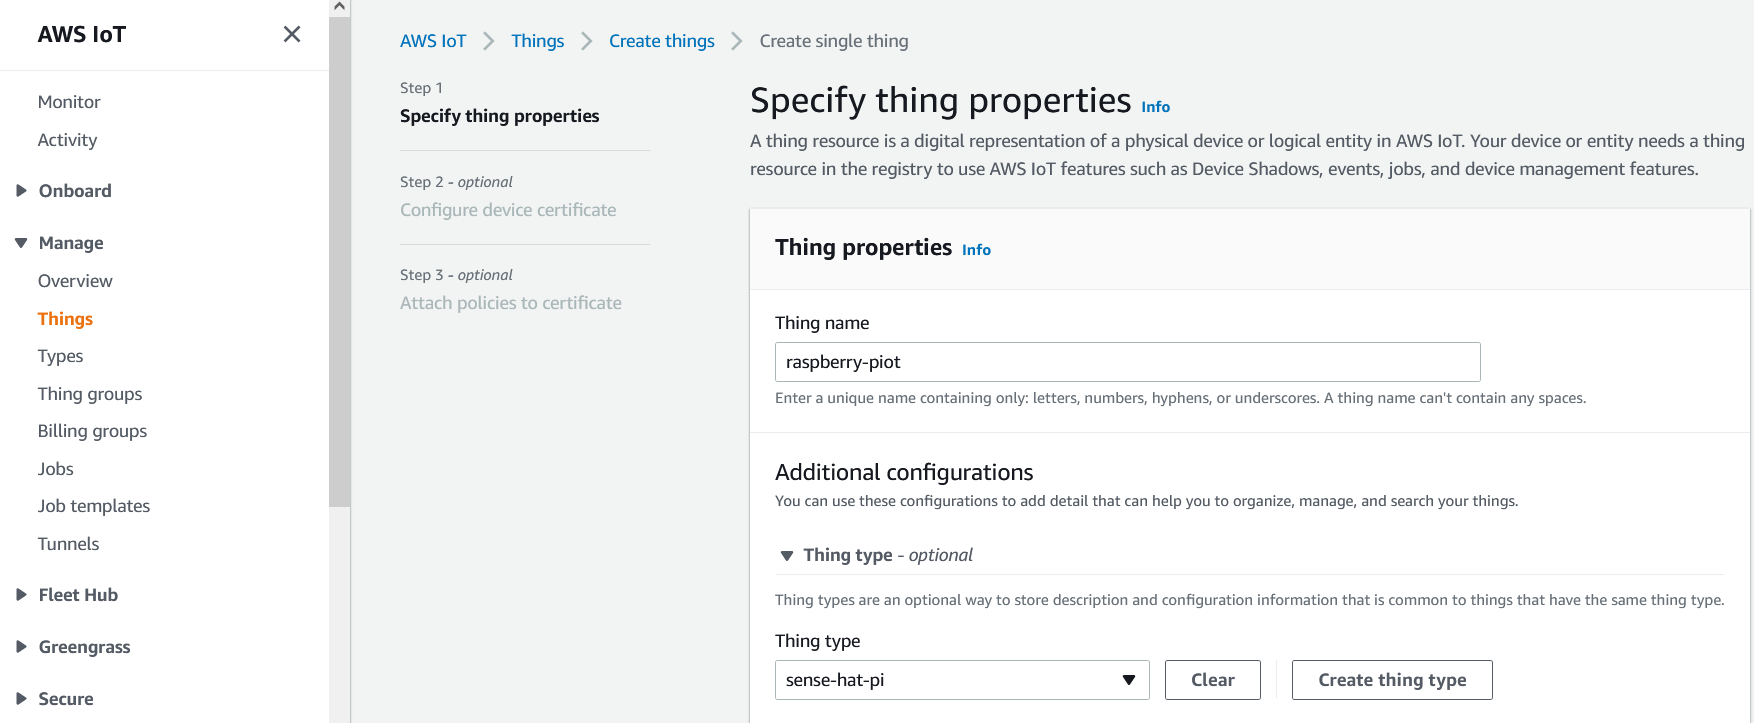
The name is the only required field here but there are several other fields which can be used to categorise your Things and manage them en masse. For now, I’ve just created a type and assigned it to my Thing.
Create a Policy
The next page asks you for a device certificate. Select Auto-generate a new certificate and click Next. We’ll get to the certificate in a minute but first you need to pick a security policy for the certificates you are about to create. Policies can be attached to certificates, which are then attached to Things. These policies define what actions can be taken against specific MQTT topics for anything (anyThing?) that is authenticating with certificates that have those policies. They are closely related to IAM roles and actions.
Select Create policy to be taken to a new screen for assigning permissions:


You can add policies one by one here, or select Advanced mode to edit the JSON policy. Below is an example policy you could use for basic_interaction (make sure you use your region and account number!):
{
  "Version": "2012-10-17",
  "Statement": [
    {
      "Effect": "Allow",
      "Action": "iot:Connect",
      "Resource": "arn:aws:iot:{region}:{awsaccountno}:*"
    },
    {
      "Effect": "Allow",
      "Action": "iot:Publish",
      "Resource": "arn:aws:iot:{region}:{awsaccountno}:*"
    },
    {
      "Effect": "Allow",
      "Action": "iot:Subscribe",
      "Resource": "arn:aws:iot:{region}:{awsaccountno}:*"
    },
    {
      "Effect": "Allow",
      "Action": "iot:Receive",
      "Resource": "arn:aws:iot:{region}:{awsaccountno}:*"
    }
  ]
}
This policy will allow our Thing to connect to IoT Core, publish messages, subscribe to topics, and receive messages on those topics. Note that this is quite a relaxed policy which allows these actions on all MQTT topics, including reserved AWS topics for shadow interactions, events, jobs etc. So obviously a policy like this is NOT suitable for a production environment.
Provision Certificates
Now we’ve created the policy to assign, we can finally create our certificates and complete the provisioning of our Thing. Back on the Create Things screen, select our newly created policy and click Create thing. AWS will generate a certificate and a set of public and private keys for your thing to use:

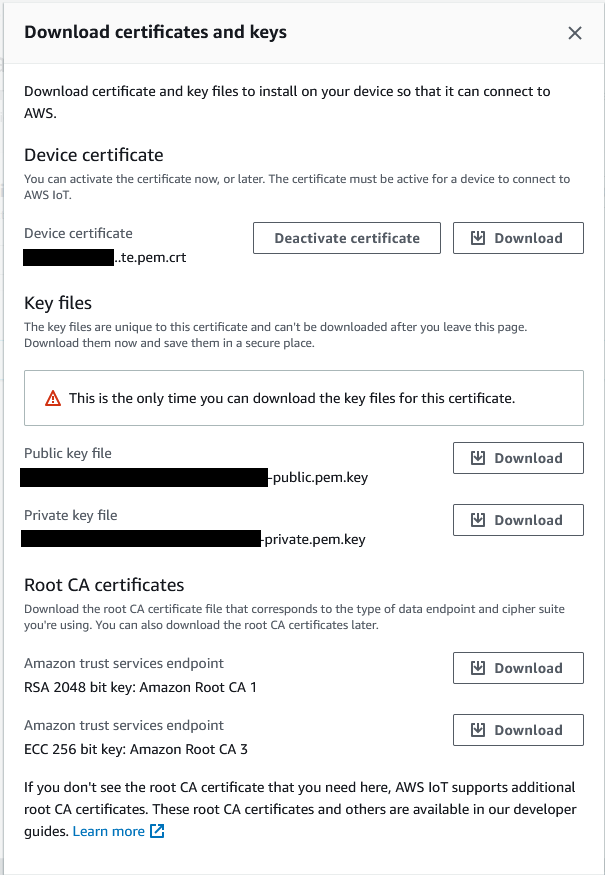
Note that you must download the certificate and keys from this page before leaving. And as advertised, this is the only time you can download them. Download the certificate, public key, private key, and the Amazon Root CA 1 (this last one is available elsewhere) and keep them somewhere safe.
Another obligatory security warning: do not lose these certificates and DO NOT share them with anyone you do not trust. With these certificates, anyone or anything can connect to your AWS account and do anything your policy allows, with a sufficiently lax policy, this could include creating new Things, new certificates, revoking other permissions, and all kinds of unsafe (and potentially expensive) havoc. You have been warned…
That does it for the cloud side for now, we will be back again later but now it is time to turn to our device.
Step 2: Build the sensor application
Now we have everything we need in the cloud, we’re ready to write some code on the raspberry pi that will take a measurement on demand and send it to IoT Core. I will make heavy use of the AWS IoT Device SDK V2 for python, there are some very helpful examples on github if you want to dig deeper: https://github.com/aws/aws-iot-device-sdk-python-v2
Install and test the sense-hat
The code we are going to write will be fairly simple but there are some dependencies to install on our pi and our python environment before we get there. A word of caution here: not all versions of raspbian OS are compatible with all versions of the AWS IoT SDK, not all versions of the SDK are compatible with all versions of python, and not all versions of the sense-hat software are compatible with all versions of python! There is unfortunately, a delicate dance to take part in to get all the pieces to fit together, the full details of which are far beyond the scope of this article. Ironically, this is an excellent example of some of the difficulties inherent in embedded systems, even on the relatively friendly raspberry pi. For reference, I built this application on a raspberry pi 3B, running raspbian Buster, using python 3.7, and AWS IoT Device SDK V2 for python version 1.5.2. Got all that?!
First among the dependencies is python itself, thankfully the raspbian OS comes with python installed but there are plenty of guides out there if you need a different version or are using a different OS, so I won’t cover that here.
Secondly, we need the sense-hat package itself:
sudo apt update
sudo apt install sense-hat
sudo reboot
To test this is installed properly, open your python console and give it a try:
pi@raspberrypi:~ $ python3
Python 3.7.3
[GCC 8.3.0] on linux
Type "help", "copyright", "credits" or "license" for more information.
from sense_hat import SenseHat
sense = SenseHat()
sense.clear()
print(sense.get_temperature())
37.178524017333984As mentioned, this may Just Work, or it may not… If not, all I can do is point you to the official documentation https://www.raspberrypi.org/documentation/hardware/sense-hat/README.md and suggest you contact your preferred deity.
Set up the python project and environment
There are many ways to manage a python environment, I will use pipenv here (https://pipenv.pypa.io/en/latest/) as it manages both the package versions and the python virtual environment for you. It’s perfectly viable to do everything here with just pip or using pip from within a venv environment, just replace ‘pipenv’ with ‘pip3’ in all the commands given here.
(Since writing this blog, we would not recommend pipenv any more, this will be discussed in part 2 coming soon)
First create a folder to hold the code and your IoT certificates, place your certs in one folder and create a main.py file in another folder. Next we want to create a pipenv environment from the second folder with the right version of python:
pipenv --python 3.7
This should give you a folder structure like the following:

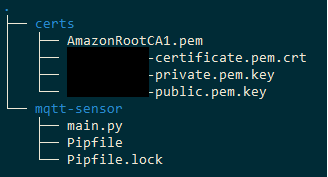
Now we want to add the right dependencies to that environment, sense-hat first:
pipenv install sense-hat
(Note that this is just installing the API to this environment, the actual installation of the sense hat libraries we did earlier is still required)
Finally, we want to install the AWS IoT device SDK:
pipenv install awsiotsdk==1.5.2
With yet more disclaimers, this install can take quite some time as it has to build and install the AWS CRT package too, see for https://github.com/aws/aws-iot-device-sdk-python-v2 for additional details and troubleshooting.
Ok, still with me? It is finally time to write some code!
Create functions to connect to AWS IoT Core
We need to create functions to connect, subscribe, and publish to the MQTT broker in AWS, using our certificates. The following code defines some error callback functions (when the connection is lost, and when it is resumed), then a function that uses these to build an MQTT connection object and connect to AWS. This connection is what we will use to both send and receive messages:
from awscrt import mqtt, io, exceptions
from awsiot import mqtt_connection_builder


def on_connection_interrupted(connection: mqtt.Connection, error: exceptions.AwsCrtError):
    print(f'MQTT Connection interrupted. error: {error}')


def on_connection_resumed(connection: mqtt.Connection, return_code: mqtt.ConnectReturnCode, session_present: bool):
    print(f'MQTT Connection resumed. return_code: {return_code} session_present: {session_present}')


def open_connection(timeout_s: int = 10) -> mqtt.Connection:
    event_loop_group = io.EventLoopGroup(1)
    host_resolver = io.DefaultHostResolver(event_loop_group)
    client_bootstrap = io.ClientBootstrap(event_loop_group, host_resolver)

    _mqtt_connection = mqtt_connection_builder.mtls_from_path(
        endpoint=args.endpoint,
        client_id=args.client_id,
        ca_filepath=args.root_ca_path,
        cert_filepath=args.cert_path,
        pri_key_filepath=args.key_path,
        client_bootstrap=client_bootstrap,
        on_connection_interrupted=on_connection_interrupted,
        on_connection_resumed=on_connection_resumed,
        clean_session=False
    )

    connect_future = _mqtt_connection.connect()
    connect_future.result(timeout_s)
    print('Connected!')
    mqtt_connection = _mqtt_connection

    return mqtt_connection
You may also notice that I have used argparser here for all the specific system information, more on that later.
Next, we want to provide some functions to publish and subscribe. Once again, a callback is used to define how the application will process a message it receives, and that callback is passed when opening the subscription:
import json
from functools import partial


def on_message(connection: mqtt.Connection, topic: str, payload: bytes):
    print(f'Received message from topic {topic}')
    try:
        message = json.loads(payload.decode('utf-8'))
    except Exception as e:
        print(f'Invalid message received from the cloud: {e}')
        return
    print(f'Message payload: {message}')


def publish(connection: mqtt.Connection, topic: str, data: str):
    print(f'Publishing message to topic {topic}: {data}')
    try:
        connection.publish(
            topic=topic,
            payload=data,
            qos=mqtt.QoS.AT_LEAST_ONCE)

        print('Message published successfully')
    except Exception as e:
        print(f'Error publishing message to the cloud: {e}')
        print(type(e))


def subscribe(topic: str, connection: mqtt.Connection, timeout_s: int = 10):
    print(f'Subscribing to topic: {topic}')
    subscribe_future, packet_id = connection.subscribe(
        topic=topic,
        qos=mqtt.QoS.AT_LEAST_ONCE,
        callback=partial(on_message, connection)
    )

    subscribe_future.result(timeout_s)
    print('Successfully subscribed! Awaiting your command...')
There are a few more things you may notice here: we are using an MQTT Quality of Service (QoS) of 1 for both directions as this is the highest level supported by IoT Core. We are also assuming that all messages sent will be a valid JSON format. Finally, we are using a partial function https://docs.python.org/3.7/library/functools.html#functools.partial to pass the MQTT connection object to the subscription callback, you will see why very soon.
Create a function to record sensor data
We want our application to record some environmental data on command using the sense-hat. And that command may as well come via MQTT, to embrace all things IoT! The following code captures information from the pressure and humidity sensors on the sense-hat, uses both to calculate the temperature, then formats this into a dictionary, ready to send to the cloud:
from datetime import datetime


def take_readings() -> dict:
    sense = SenseHat()
    sense.clear()

    time_now = datetime.now().strftime("%d/%m/%y-%H:%M:%S")
    data = {
        'temperature_t': sense.get_temperature(),
        'temperature_p': sense.get_temperature_from_pressure(),
        'humidity': sense.get_humidity(),
        'pressure': sense.get_pressure(),
        'time': time_now
    }
    print(f'Captured readings: {data}')
    return data
And now, we can use this method to capture our data when whenever we get the command and send it to the cloud by modifying the on_message callback from earlier:
def on_message(connection: mqtt.Connection, topic: str, payload: bytes):
    print(f'Received message from topic {topic}')
    try:
        message = json.loads(payload.decode('utf-8'))
    except Exception as e:
        print(f'Invalid message received from the cloud: {e}')
        return
    print(f'Message payload: {message}')

    if 'command' in message and message['command'] == 'record':
        response_topic = f'{topic}/res'
        readings = take_readings()
        publish(connection, response_topic, json.dumps(readings))
        print('Readings sent to the cloud!')
    else:
        print(f'Unrecognised message type: {message}')
As you can see, this is why we needed to pass the connection to this callback. The code is responding to the topic it received the command from by adding ‘/res’, this is a common request-response pattern for MQTT. The incoming message is expected to take the form {“command”:”record”}. Once again, the json library is used to format the outgoing data correctly, to keep it all consistent.
Running the application
There is one last piece of code we need to get off the ground now: we need a main function and to provide all the certificates and configuration we need to open the connection:
import time


if __name__ == '__main__':
    parser = argparse.ArgumentParser(description='Main executable for the MQTT IoT sensor')
    parser.add_argument('--endpoint', default=3, type=str, help='AWS IoT core endpoint')
    parser.add_argument('--client_id', default=3, type=str, help='The client ID to connect to IoT Core with')
    parser.add_argument('--root_ca_path', default=3, type=str, help='Filepath of the root CA certificate')
    parser.add_argument('--cert_path', default=3, type=str, help='Filepath of the Thing certificate')
    parser.add_argument('--key_path', default=3, type=str, help='Filepath of the Thing private key')

    args = parser.parse_args()
    print('Starting MQTT sensor!')
    mqtt_conn = open_connection()
    inbound_topic = 'cmd/raspberry-piot/sense'
    subscribe(inbound_topic, mqtt_conn)

    while True:
        time.sleep(1)
This code will take in the arguments you provide, use these to open a connection to AWS, subscribe to the inbound MQTT topic, and then wait for messages until it gets shut down Take note of the MQTT topic that’s getting passed here: ‘cmd/raspberry-piot/sense’
Putting it all together… https://bitbucket.org/greencustard/aws_iot_testing_blog/src/master/
To start this application, we now need to provide paths for the certificates and keys (they should be in the certs folder by now). A client ID must be provided too, this can be anything but must be unique for each connection using those certificates. Finally, the AWS IoT Core endpoint is needed, this can be found in the Settings page of the IoT Core console.
Putting it together, you will get a command that looks something like the following:
pipenv run python main.py --endpoint XXXX.iot.REGION.amazonaws.com --client_id sense_pi --root_ca_path ../certs/AmazonRootCA1.pem --cert_path ../certs/YYYY-certificate.pem.crt --key_path ../certs/ZZZZ-private.pem.key
If all is well, you’ll see some connection messages and your IoT device is ready to be used!
Triggering the application from AWS
When the application is up and running and connected to the cloud, it is time to start triggering the sensor readings. This is done by sending the correct JSON message to the correct MQTT topic on the AWS message broker. This could be done with another bespoke application, or an MQTT tool (e.g. MQTT.fx), but the AWS IoT console helpfully provides a page specifically for testing.
Go back to the AWS IoT console and select the Test page on the left hand pane. In this page, you can publish and subscribe to specific MQTT topics, and even use wildcards to effectively subscribe to multiple topics at once. First of all, we want to subscribe to the response topic for the application of cmd/raspberry-piot/sense/res as in the below picture:


Next, select the Publish to a topic tab. On this tab enter the request topic (cmd/raspberry-piot/sense) under topic name, input the correct JSON format ({“command”:”record”}) as the message payload, then click Publish. If everything works you should the response with the data readings on the subscription you opened:

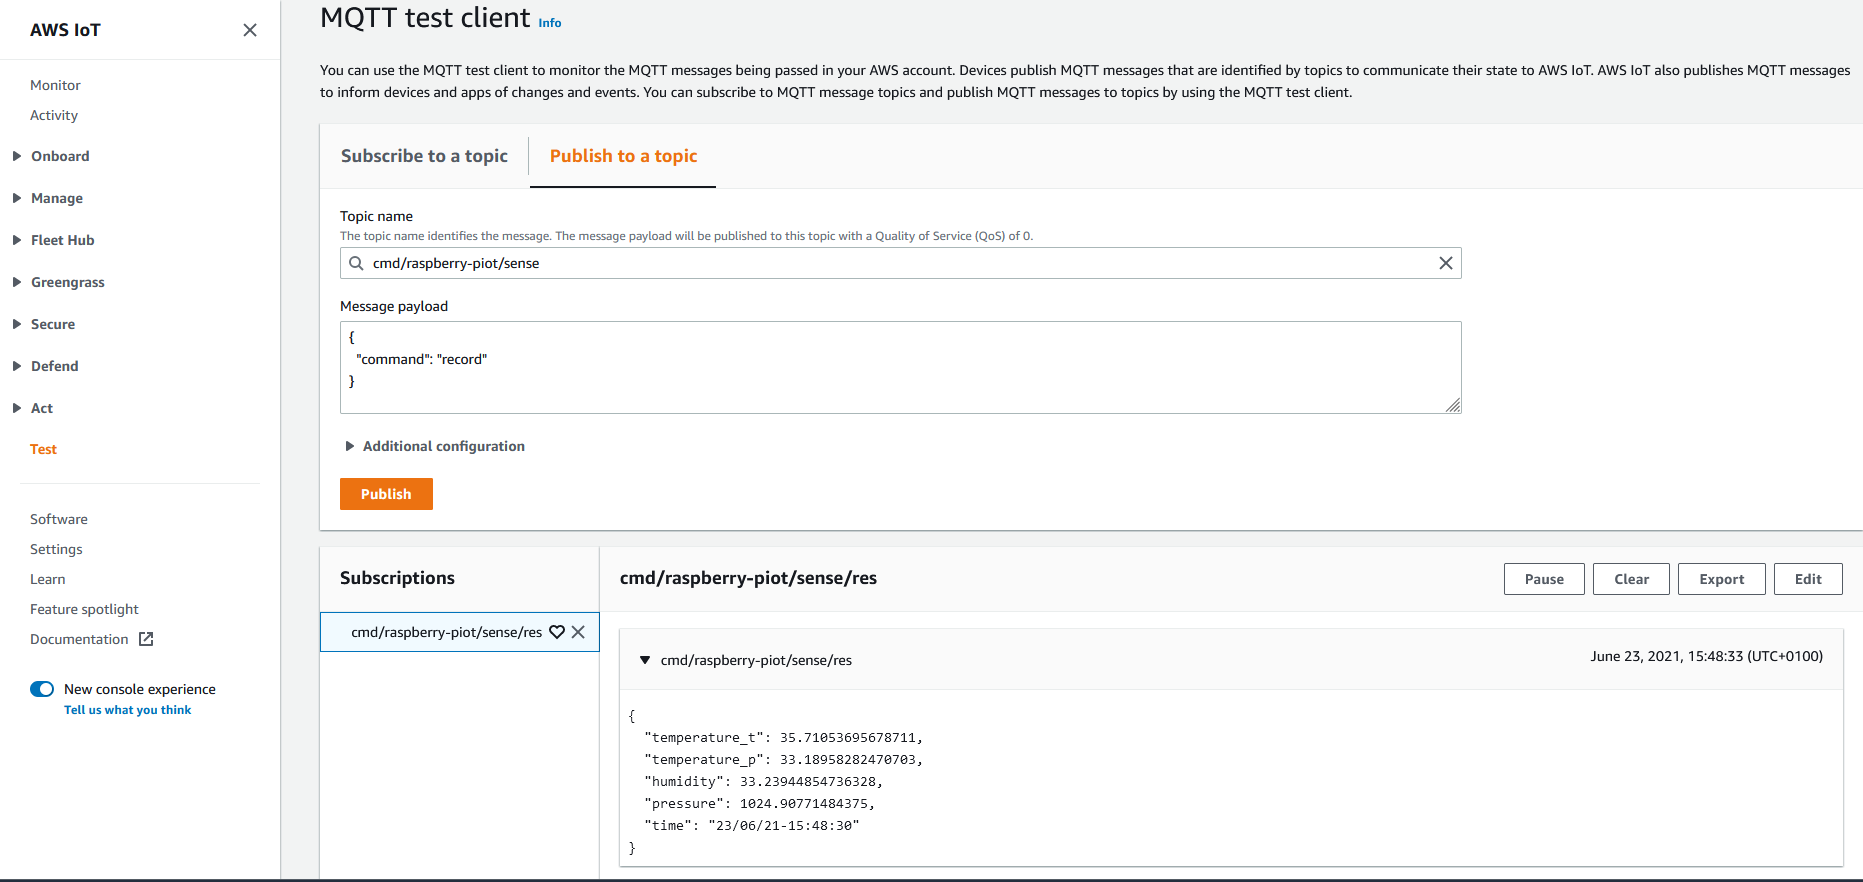
If your pi has a good internet connection, this response should take no more than a second. You should also see application logs for receiving the message, taking the readings, and returning the response.
Step 3: Store the messages in an S3 bucket
Now that we have a fully functioning IoT sensor, the final step is to store all that sensor data in the cloud, ready for whatever use case you desire. A simple way to do this is to create an S3 bucket and store the JSON data directly in there using an IoT Rule.
Create an S3 bucket
Navigate to the S3 service on the AWS console. Select Create bucket from the buckets page and fill in the properties for the new bucket. Most of the default settings will serve us well enough here: the bucket does not need to be public, and we may as well encrypt the data. It is also a good idea to create the bucket in the same region you have been working in for IoT Core.

Create an IoT Rule
In AWS IoT, you can create Rules that get triggered every time a topic or set of topics receive an MQTT message. The Rule can then filter the message content (if it is JSON) and even extract parameters from the topic. Finally, the Rule can trigger one or more Actions and forward the extracted data to a range of services and endpoints (DynamoDB, Lambda, S3 etc.). All we want to do here is take the full incoming JSON message and store it in our S3 bucket with a suitable object key.
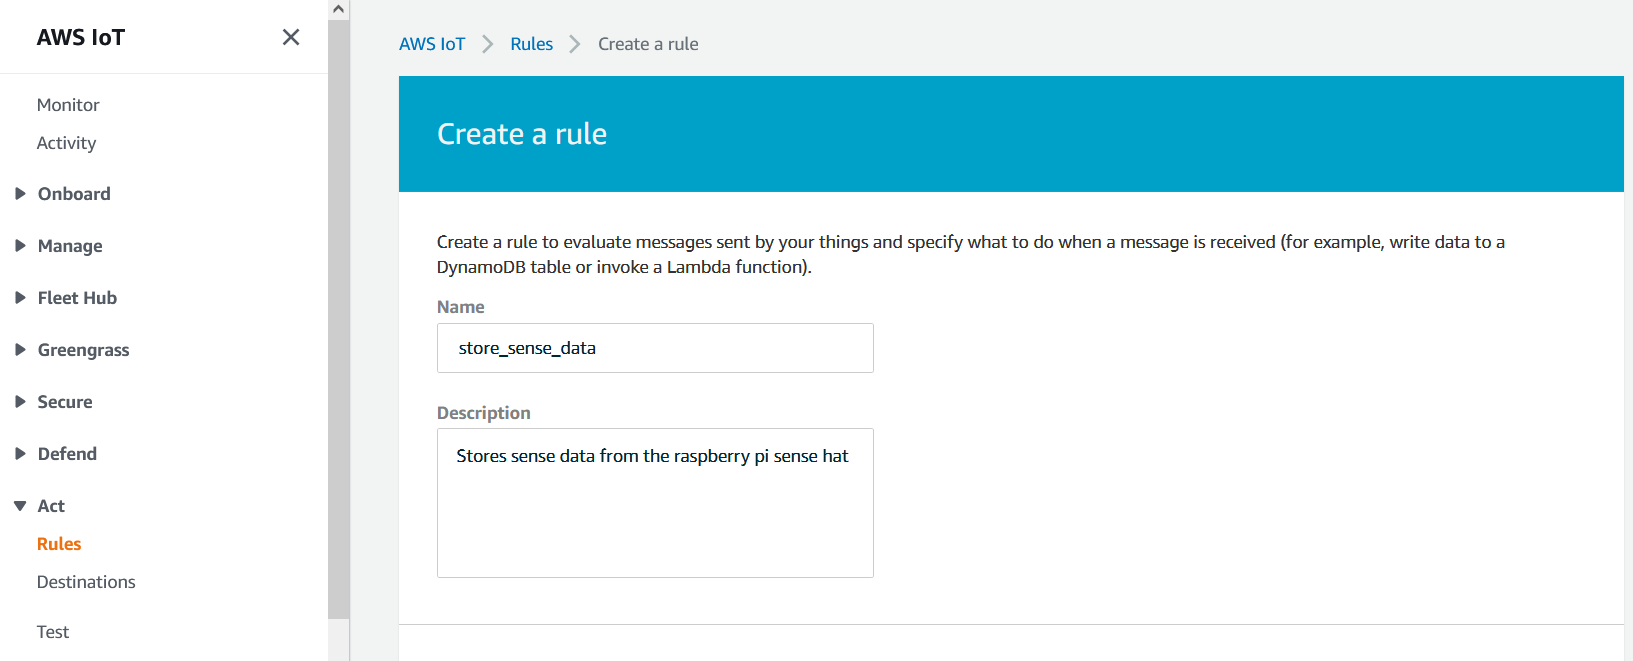
Return to the IoT console once again, select the Act dropdown and the Rules page, then select Create to start configuring a new rule. First, give the rule a name and a description:

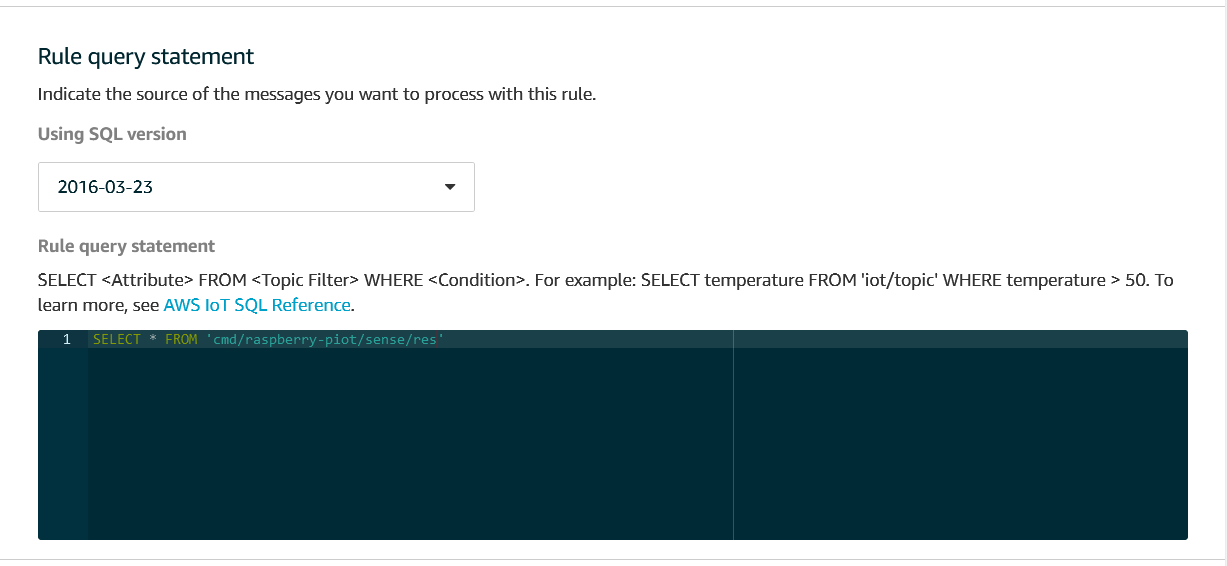
Next, the rule needs its filter configured. This uses a SQL-like query to filter the message (see https://docs.aws.amazon.com/iot/latest/developerguide/iot-sql-reference.html?icmpid=docs_iot_console for more detail). We just want to select everything from our response topic:

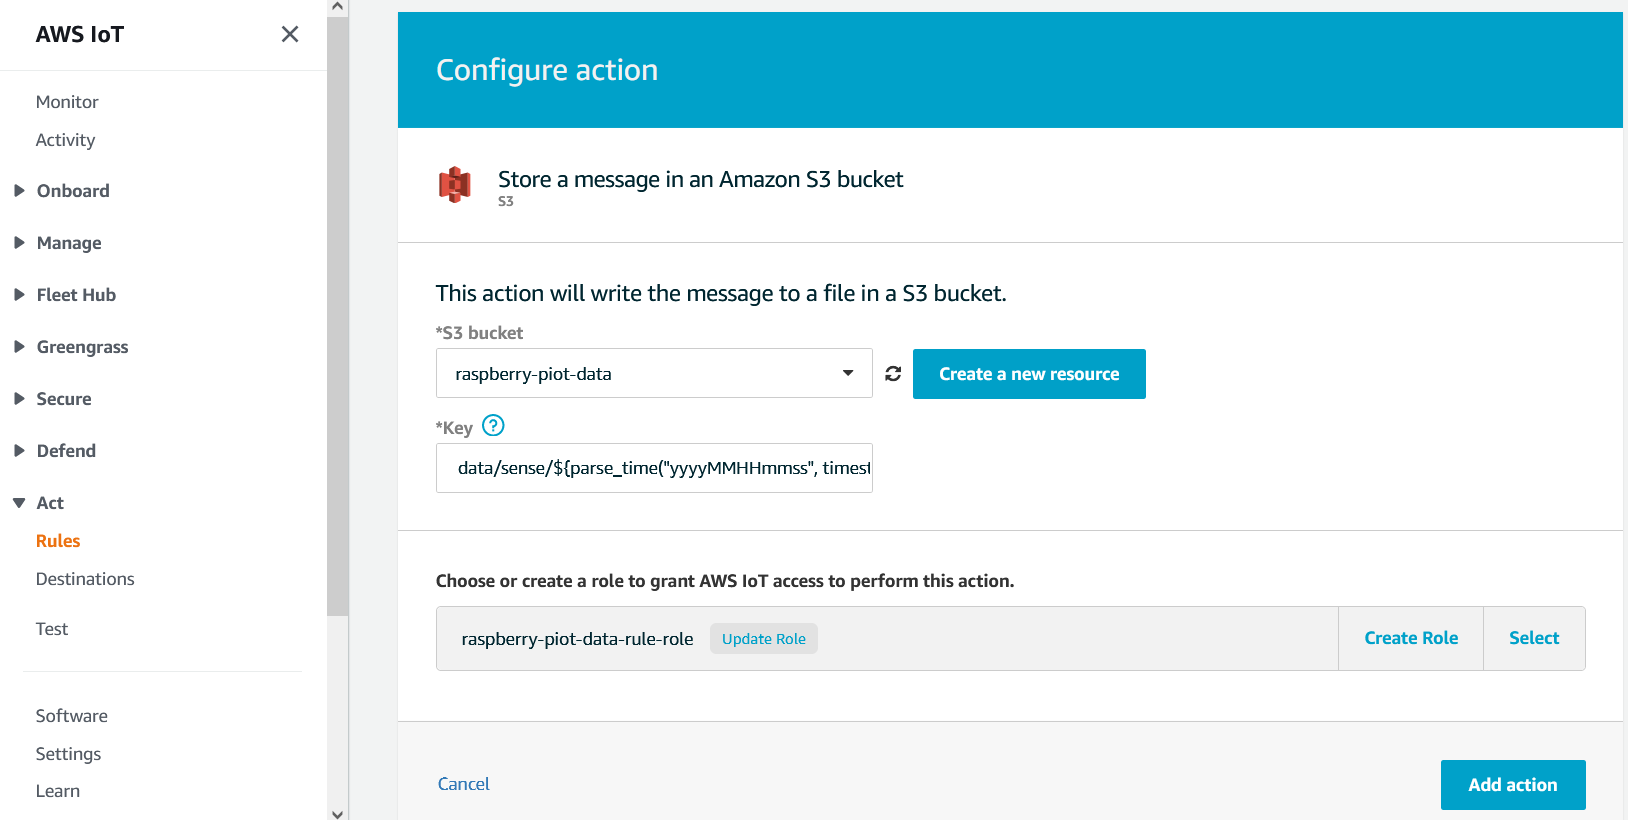
Next, the action needs to be added. Click Add action and select the S3 option. Choose the new bucket and enter the key. The key field is actually quite powerful in its own right, it has support for some custom input and markup. Here, we want to use the current timestamp as the main part of the key, using the parse_time function as follows: data/sense/${parse_time("yyyyMMdd-HHmmss", timestamp())}.json. This ensures that every incoming reading will create its own unique object. Finally, the action needs to be given an IAM role. It is recommended that this role covers only write operations to S3. See below for the full picture:

So now that the Rule is set up, it should pick up every incoming message on the response topic and store it in our S3 bucket.
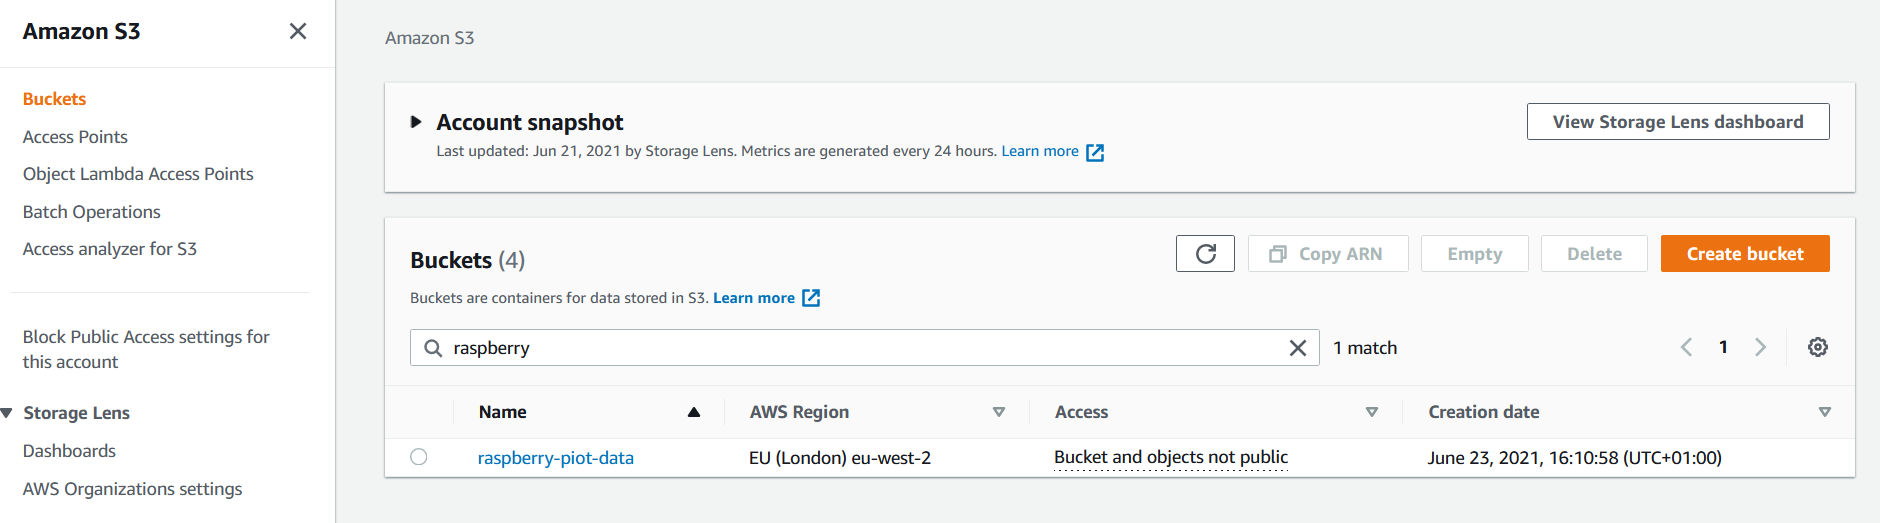
Return to the Test page on IoT core to trigger another reading by sending the JSON command to cmd/raspberry-piot/sense. This time, go to the S3 bucket and you should see a new JSON object under the data/sense/ partition:


Congratulations! You’ve collected your first set of IoT data!
Conclusion
You should now know how to provision a new Thing in the cloud, build a basic IoT application, and then use the IoT Core services to store that data in S3.
However, despite all the talk of testing these applications, all the testing so far has involved poking buttons and sending messages manually. So read on to part 2 to find out how to automate testing.